
Table of Contents
- Why Damp Climates Demand Different Bathroom Wall Materials
- Bathroom Wall Materials Comparison: Tile, Panels, and Stone
- Moisture-Resistant Bathroom Wall Panels: What to Look For
- How to Ventilate a Bathroom to Protect Your Walls
- Substrate Preparation and Vapor Barriers for Wet Areas
- Your Bathroom Renovation Materials Guide: Matching Materials to Your Space
- Common Mistakes When Choosing Bathroom Wall Materials
- Frequently Asked Questions
Last Updated: September 29, 2026
Why Damp Climates Demand Different Bathroom Wall Materials
Bathroom wall materials matter more in a damp climate than almost anywhere else in the home. This guide from Bathroom Renovators covers how to choose bathroom wall materials for damp climates, where trapped moisture, not heavy splashing, causes most wall failures. A wall that stays wet and never dries will grow mold behind the finish.
Bathroom Wall Materials Comparison: Tile, Panels, and Stone
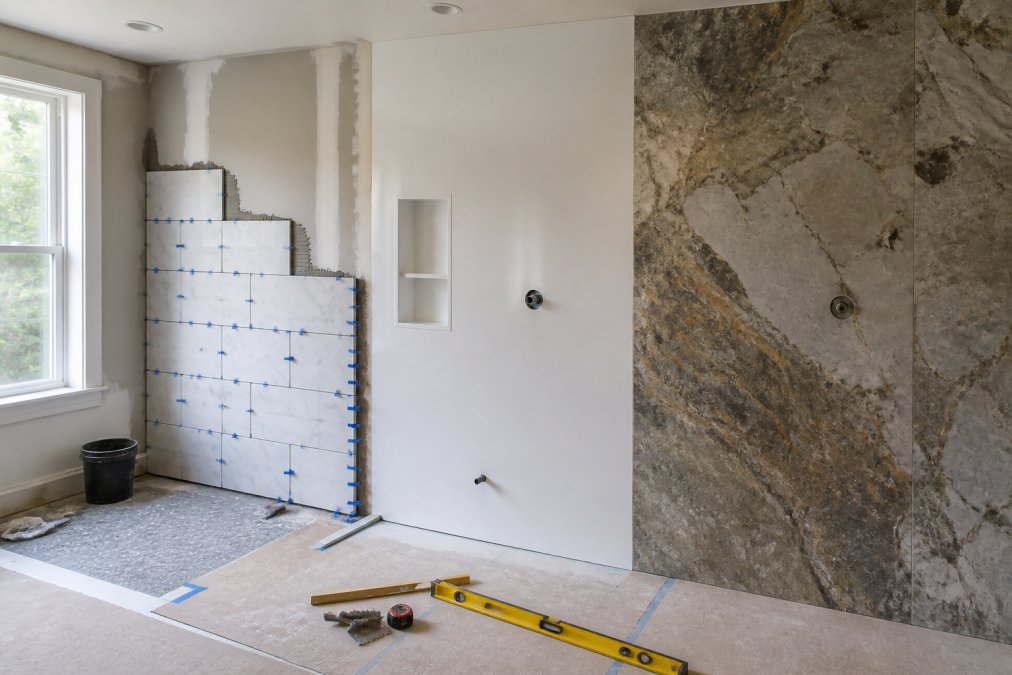
The three main families of bathroom wall materials are tile, panels, and stone. Each handles moisture differently and fits a different budget and skill level.
| Material | Moisture Resistance | Maintenance | Best For |
|---|---|---|---|
| Porcelain and ceramic tile | High when grout is sealed | Regular grout cleaning | Classic looks, custom layouts |
| Acrylic and PVC panels | High, non-porous surface | Wipe-down, no grout | Fast installs, low upkeep |
| Natural stone and large slabs | Medium, needs sealing | Periodic resealing | High-end, spa-style spaces |
Porcelain and Ceramic Tile
Porcelain tile is denser and less porous than ceramic, so it resists water ingress better in wet areas; ceramic costs less and suits walls with less direct spray. Both rely on grout lines, and grout is the weak point, cement-based grout absorbs water and stains, and sealing needs redoing.
- Pros: huge design range, durable surface, easy to clean
- Cons: grout needs sealing and scrubbing, cold to the touch, heavier install
Acrylic and PVC Wall Panels
Acrylic panels and PVC wall cladding are non-porous, so water beads on the surface instead of soaking in, and there are no grout lines where mold growth starts. This is the fastest option to install and often the most affordable for a simple refresh.
- Pros: waterproof, low maintenance, quick to fit over a sound wall
- Cons: fewer high-end finishes, can flex if the wall behind is uneven
Natural Stone and Large-Format Slabs
Natural stone, including marble and quartz, delivers the most striking finish, and large-format slabs cut down on seams and grout lines in a shower surround. Stone is porous, though, so it needs sealing and periodic resealing against constant humidity.
- Pros: premium look, fewer seams, adds resale appeal
- Cons: higher cost, needs sealing, heavier and harder to install
Moisture-Resistant Bathroom Wall Panels: What to Look For
Moisture-resistant bathroom wall panels are the practical pick for most damp-climate bathrooms, but “moisture-resistant” is a marketing phrase, not a specification. The panels that last share a few measurable traits you can check before buying.
The four traits that separate real panels from lookalikes
- Non-porous face: acrylic and PVC faces bead water; a wood-veneer face does not, no matter what the coating claims.
- Sealed, interlocking joints: a flush tongue-and-groove or click-lock edge leaves no gap for water to slip behind.
- Waterproof core: look for extruded PVC, fiberglass-reinforced plastic, or a waterproof composite. A wood-composite core can pass a splash test and still fail over a decade of humidity.
- Mold and mildew resistance built into the material, not just the coating, which wears through at the seams first.
Match the panel to the wet zone
Not every wall needs the same panel. Split the room into three zones:
- Zone 1, inside the shower or tub surround: full waterproof panel system with sealed joints and a waterproof substrate behind it.
- Zone 2, splash zones (beside the sink, behind the toilet): moisture-resistant panel or tile, sealed at the edges.
- Zone 3, dry walls: standard moisture-resistant drywall is usually fine if ventilation is good.
What to check on the label and the sample
- Warranty language: a wet-area panel says so explicitly. If the warranty excludes shower surrounds, it is not one.
- Fire and smoke ratings: for panels near heat sources, look for a flame-spread rating consistent with Canada’s National Building Code requirements for interior wall finishes.
- Thickness: thin panels flex and pull away at the seams; rigid panels hold their joint line.
- Edge profile: butt joints rely on sealant alone; interlocking joints add a mechanical barrier.
Run your hand along the joint where two panels meet. If you can feel a lip or gap, water will find it. A flush, interlocking edge is the sign of a panel built for wet areas.
The hidden cost of cheap panels
A low-cost panel can look identical to a quality one on the showroom floor, but the difference shows up in year three, when seams lift and water gets behind the face. The fix is not a new bead of sealant, it is removing the panel, drying the substrate, and starting over.
How to Ventilate a Bathroom to Protect Your Walls
Ventilation turns a damp bathroom into a dry one, even the best wall material fails if moisture has nowhere to go. The goal is to push humid air outside, not into the rest of the house.
- Fit an exhaust fan sized to the room, and run it during and after every shower.
- Keep the fan running for at least 15 to 20 minutes after you finish.
- Open a window or door when you can, to give air a path through.
- Leave the shower door or curtain open after use so the surround dries.
- Wipe down walls in high-splash zones to cut standing water.
- Check humidity with a cheap hygrometer and keep it down.
Substrate Preparation and Vapor Barriers for Wet Areas
Substrate preparation decides whether your walls last. The substrate is the surface behind the tile or panel; if it is not right, the finish on top will fail, and in a damp climate, faster than in a dry one. Most guides skip this section entirely.
Choose the right backer board
Not all backer boards handle moisture the same way. The three you will see most often:
- Cement board: dimensionally stable when wet, and the standard choice for shower surrounds. Heavier to cut and install.
- Fiber-cement board: similar moisture performance, lighter, and easier to handle. Good where weight matters.
- Moisture-resistant drywall (green board): paper-faced and moisture-resistant, but not waterproof. Acceptable on dry bathroom walls with good ventilation, but using it behind a shower surround is a common and expensive mistake.
Why a vapor barrier matters more in a damp climate
A vapor barrier stops moisture from passing into the wall cavity. In wet areas, it goes behind the substrate, not on top of it. In a damp coastal climate, it has to manage two directions of moisture: the humid air inside the bathroom and the seasonal humidity outside. That is why the barrier and substrate must work as a system, gaps, tears, or unsealed penetrations around plumbing let moisture through exactly where it does the most damage, at the framing.
The order that works
- Inspect and repair any water damage first. Soft framing or stained sheathing will not fix itself behind a new wall.
- Fit a vapor barrier to block moisture from the cavity, sealing every seam and penetration around pipes and valves.
- Install a waterproof substrate rated for wet areas, cement or fiber-cement board in Zones 1 and 2.
- Seal the seams and corners with the manufacturer’s approved tape and compound, or a liquid-applied waterproofing membrane over the whole wet area.
- Then set the tile, stone, or panels.
Skipping the vapor barrier to save a day is the most expensive shortcut in a bathroom. Trapped moisture rots the framing behind the wall, and you will not see it until the surface starts to fail. By then the repair is a demolition job, not a patch.
Climate-specific detail: the drying direction
In a damp climate, walls need a way to dry. A vapor barrier on the wrong side of the assembly can trap moisture instead of blocking it. The safe pattern for most Canadian bathrooms is a continuous barrier on the warm, interior side of the wall, with the substrate and finish layered over it, and ventilation sized to remove the humidity the room produces.
What to confirm in writing before work starts
- The backer board type and thickness for each zone
- The vapor barrier product and how seams and penetrations are sealed
- Whether a liquid-applied membrane is used over the wet area
- The exhaust fan’s rated airflow and where it vents
If you are hiring a bathroom-renovator, ask for these four items in the quote. A contractor who cannot name them is guessing, and in a damp climate, guessing causes callbacks.
Your Bathroom Renovation Materials Guide: Matching Materials to Your Space
A bathroom renovation materials guide is only useful if it matches the material to the room. The right choice for a busy family shower is not the right choice for a rarely used powder room.
Ask three questions before you commit.
Common Mistakes When Choosing Bathroom Wall Materials
- Chasing looks over moisture resistance: a beautiful wall that cannot handle humidity will not stay beautiful
- Skipping the substrate: the finish is only as good as what is behind it
- Ignoring ventilation: no material survives a room that never dries
- Choosing porous stone without sealing: marble and similar stone soak up water fast
- Leaving grout unsealed: grout lines are where mold growth starts
- Sizing the fan wrong: a weak fan leaves humidity behind
- Forgetting the vapor barrier: moisture reaches the framing and rots it
Moisture resistance is a system, not a single product. Material, substrate, vapor barrier, and ventilation all have to work together. Miss one and the others cannot save the wall.
Bathroom Renovators gets projects done typically in 7 to 10 days, backed by a 1-year warranty. If you want a bathroom done right, on time, without surprises, that is our standard.
Frequently Asked Questions
Why do my bathroom walls look like they’re sweating?
Condensation forms when warm, moist air from showers meets cooler wall surfaces. In damp climates, this happens more often because exterior walls stay cold longer. Without proper ventilation or moisture-resistant bathroom wall panels, that condensation soaks into grout lines and drywall, creating ideal conditions for mold growth. Running an exhaust fan for 20 minutes after showers and choosing non-porous materials like porcelain tile or acrylic panels reduces surface moisture dramatically.
What is the best moisture barrier for bathroom walls?
A properly installed vapor barrier behind the substrate is essential. In most Canadian homes, 6-mil polyethylene sheeting or a waterproof membrane like a bonded sheet membrane works well. The barrier must overlap seams and extend at least 150mm beyond wet areas. Pairing a vapor barrier with moisture-resistant wall panels and a sealed substrate prevents water ingress from reaching framing, which is where costly rot and mold problems begin.
How do I prevent mold growth on bathroom walls in humid areas?
Start with non-porous materials such as porcelain tile, quartz, or PVC wall cladding that leave no organic food source for mold. Seal all grout lines and joints annually. Ventilate during and after every shower using an exhaust fan rated for your bathroom’s cubic footage. Fix any leaks immediately. In damp climates, adding a humidity sensor that triggers the fan automatically keeps moisture levels below the threshold mold needs to establish.
How long does a bathroom wall renovation take?
A typical bathroom wall renovation, including substrate preparation, vapor barrier installation, and finishing with tile or panels, takes 7 to 10 days for a standard-sized bathroom. Complex custom designs with natural stone or large-format slabs may take longer. Working with an experienced renovator who handles material selection, ventilation integration, and installation as one coordinated project reduces delays and ensures the finished walls actually hold up to moisture.
Choosing wall materials for a damp bathroom comes down to matching the product to the room, then getting the substrate and airflow right. Get those three in line and your walls will hold up for years. Bathroom Renovators brings over 26 years of experience, custom designs tailored to your family, and a 7 to 10 day turnaround with a 1-year warranty. Get your free consultation and start with a clear plan for a bathroom that lasts.
