
Last Updated: October 22, 2026
Quick Summary
The signs of mold behind bathroom vanity cabinets include a musty earthy smell that lingers after cleaning, dark splotches or a green tint on the cabinet back, soft or swollen wood near the plumbing, peeling paint or bubbling caulk, persistent condensation, water stains under the sink, and a white powdery film that returns after wiping. Two or more signs together usually mean moisture has been sitting there for a while.
- Mold behind a vanity grows from trapped moisture in a dark space with little airflow, not from dirt.
- Wrap a dry paper towel around each pipe connection and check it after a day for drips.
- A safe vanity check takes about 20 minutes and needs only a flashlight, paper towel, screwdriver, camera, mask and gloves.
- Never spray bleach into a wall cavity before tracing the moisture source, as it spreads spores and hides evidence.
- If growth covers more area than roughly a dinner plate or keeps returning, professional remediation is recommended.
Table of Contents
- Why Mold Grows Behind a Bathroom Vanity
- 7 Signs of Hidden Mold in Bathroom Cabinets
- Water Damage Under Bathroom Vanity: Tracing the Source
- How to Check for Mold Behind Walls and Under the Sink
- Mold vs. Stains, Mineral Deposits, and Wood Discoloration
- Bathroom Mold Prevention That Actually Works
- What to Do After Finding Suspected Mold
- Frequently Asked Questions
Why Mold Grows Behind a Bathroom Vanity
Mold behind a bathroom vanity is a growth problem caused by trapped moisture, not by dirt.
That combination makes the cabinet interior one of the first places mold takes hold.
The cabinet looks fine from the outside. The back panel and the wall cavity behind it tell a different story.
This guide covers the warning signs, how to check safely, and what to do next.
7 Signs of Hidden Mold in Bathroom Cabinets
Hidden mold in a bathroom cabinet rarely announces itself. You usually find it by smell first, then by touch, then by sight. Here are the seven signals worth acting on.
- A musty, earthy smell that lingers after you clean
- Dark splotches or a green tint on the cabinet back or shelf
- Soft or swollen wood near the plumbing
- Peeling paint or bubbling caulk at the cabinet edges
- Persistent condensation on pipes or the cabinet interior
- Water stains or drips under the sink
- A white, powdery film that returns after wiping
One sign alone is worth a look. Two or more together usually means moisture has been sitting there for a while.
Musty Odors and Visible Discoloration
The nose is the most reliable early warning. A musty or earthy smell in a small bathroom often points to mold behind bathroom vanity cabinets long before you see anything.
Visible discoloration shows up next. Look for black splotches, a green tint, or white mold creeping along the cabinet interior and the wall behind it. Mildew often appears first on the cabinet door and around the hinges.
Warped Wood and Peeling Paint
Wood that swells, softens, or separates is a moisture signal. Press a screwdriver handle gently into the cabinet base. If it sinks in, the wood has taken on water.
Peeling paint and bubbling caulk tell the same story. Paint lets go when the surface behind it stays damp. That is water damage under a bathroom vanity showing itself.
Water Damage Under Bathroom Vanity: Tracing the Source
You cannot fix mold without fixing the water. Trace the source before you clean anything.
Start with the plumbing. Check the supply lines, the P-trap, and the shut-off valves for drips under the sink.
Then check the seals. Look at the caulk line where the vanity meets the wall and floor.
Finally, look up. A leaky pipe in the wall cavity or a failing shower seal above can send water down into the vanity space.
How to Check for Mold Behind Walls and Under the Sink
A safe check takes about 20 minutes and needs no special tools. The goal is not to confirm mold by eye, it is to gather evidence of moisture so you can decide whether to clean, repair, or call in a professional.
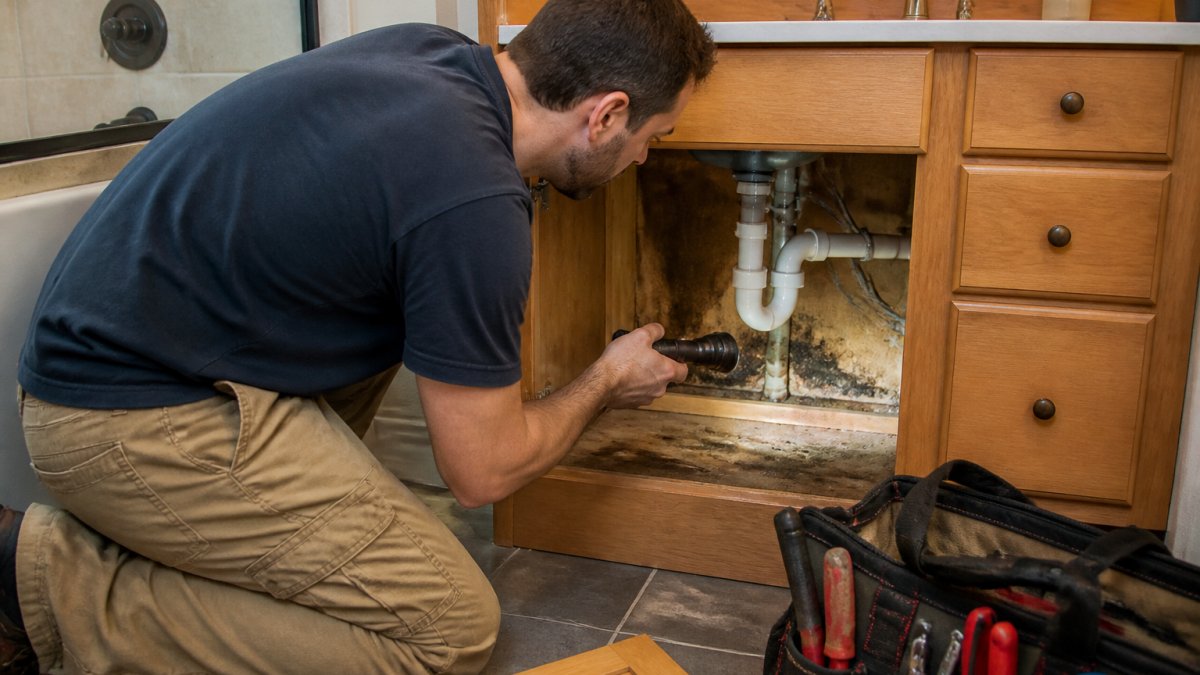
What you’ll need:
- A flashlight or phone light
- A dry paper towel
- A screwdriver with a flat handle
Steps:
- Empty the cabinet and remove the shelves. Take everything out so you can see the full back panel, side walls, floor, and shelf edges. Set aside anything with visible growth or a musty smell.
- Shine the light along the back panel, corners, and shelf edges. Look for dark splotches, a green tint, white powdery film, or fuzzy texture. Pay attention to the seam where the back panel meets the side walls, that is where condensation collects first.
- Photograph anything suspicious before you touch it. A phone photo with the light angled low shows texture that a straight-on shot misses, and it gives a contractor a baseline if you need to escalate.
- Run the paper towel along the pipes and cabinet base. A dry towel stays dry. A damp towel means active moisture, not just an old stain. Check the supply lines, the P-trap, the shut-off valves, and the cabinet floor under each connection.
- Gently probe soft spots in the wood with the screwdriver handle. Press, do not stab. If the handle sinks in or the wood crumbles, the material has taken on water and is likely beyond cleaning.
- Check the caulk line and the wall behind the cabinet. Look for bubbling, cracking, or a gap where the vanity meets the wall and floor. Shine the light into the gap, staining or dark growth on the wall side is a sign moisture is coming from behind the cabinet, not just from a drip under the sink.
- Look up and around. Check the wall above the vanity and the shower seal on the shared wall. A failed shower seal or a pipe in the wall cavity can send water down into the vanity space even when the under-sink plumbing looks dry.
What each finding tells you:
| Finding | What it suggests | Next step |
|---|---|---|
| Damp paper towel on a pipe joint | Active drip or condensation | Tighten or replace the connection; recheck in 24 hours |
| Damp cabinet floor but dry pipes | Water tracking from the wall or floor | Check caulk line and wall behind the cabinet |
| Soft wood at the base | Long-term moisture, likely material damage | Plan for cabinet repair or replacement |
| Staining on the wall behind the cabinet | Source is higher up or in the wall cavity | Stop DIY inspection; call a professional |
| Dry stains with no dampness | Old leak, already resolved | Clean, monitor, and confirm the source is fixed |
For how to check for mold behind walls, look for staining or bubbling paint on the bathroom side of the wall. Do not cut into drywall yourself.
Never spray bleach or water into a wall cavity or onto suspected mold before you have traced the moisture source. You will spread spores and hide the evidence a contractor needs to find the leak.
If you want an objective read on dampness, a cheap hygrometer placed inside the cabinet for a few days can show whether humidity stays elevated after showers. It will not identify mold, but it will tell you whether the space is drying out between uses.
Mold vs. Stains, Mineral Deposits, and Wood Discoloration
Not every dark mark is mold. Telling the difference saves you from unnecessary panic and unnecessary work.
| What you see | Likely cause | How to tell |
|---|---|---|
| Black or green fuzzy patches | Mold | Grows outward, smears when wiped |
| White chalky film | Mineral deposits | Dissolves with a vinegar wipe, returns slowly |
| Brown rings or streaks | Water stains | Flat, dry, no growth |
| Grey or dark wood grain | Natural wood discoloration | Follows the grain, dry to the touch |
| Pink or orange film | Mildew or bacteria | Common in showers and on caulk |
Mold usually has texture and spreads. Stains and mineral deposits sit flat and dry. When in doubt, photograph it and get an expert opinion before you clean.
Bathroom Mold Prevention That Actually Works
Bathroom mold prevention comes down to three things: dry the air, fix the leaks, and keep the cabinet breathing.
- Run the exhaust fan during and after every shower (Take Action – Preventing Mould)
- Wipe down shower walls and the vanity top after use
- Fix drips under the sink as soon as you spot them
The materials matter too. Specifying materials that hold up to the region’s moisture rather than the cheapest option on the shelf can prevent a lot of callbacks.
Leave a small gap between stored items and the cabinet back panel. Airflow behind your bottles and towels is the cheapest mold prevention you will ever install.
What to Do After Finding Suspected Mold
Small surface mildew on a cabinet door is a cleaning job. Anything more is a repair and moisture job.
Here is the decision sequence we recommend.
Step 1: Stop the water first. Fix the leak, reseal the caulk, or correct the ventilation before you clean anything.
Step 3: Decide whether this is a DIY cleanup or a professional job.
| Situation | Recommended path |
|---|---|
| Small spots on a cabinet door, shelf, or caulk line; wood is firm and dry | DIY clean with a bathroom-appropriate cleaner, then dry fully |
| Growth on the cabinet back panel or wall behind the cabinet | Professional assessment, the source is likely in the wall or plumbing |
| Soft, swollen, or crumbling wood | Repair or replacement, not cleaning |
| Growth covers an area larger than roughly a dinner plate, or keeps returning after cleaning | Professional remediation |
| Anyone in the home has asthma, allergies, or a compromised immune system | Professional assessment before any DIY cleanup |
| You smell musty odor but cannot see growth | Professional moisture inspection |
Step 5: Document and monitor. Photograph the area before and after cleaning, note the date, and recheck the same spots in two weeks and again in a month. If growth returns, the moisture source was not fully resolved.
Step 6: Confirm the space is drying out. After showers, leave the cabinet door open for a while and run the exhaust fan.
When to call a professional:
- The mold sits behind the cabinet, in the wall cavity, or under the floor
- The cabinet or surrounding drywall is soft, swollen, or stained
- The smell persists after cleaning and drying
If the cabinet itself is swollen or the wall behind it is affected, a targeted renovation is often the faster path. We handle water damage repairs and full bathroom renovations, typically finishing in 7-10 days, and we back our work with a 1-year warranty. You can get your free consultation to talk through what you are seeing.
Cleaning mold without fixing the moisture is a temporary fix. Stop the water, document what you found, and only then decide between a DIY cleanup and a professional repair.
Frequently Asked Questions
What are the first signs of mold behind a bathroom vanity?
The earliest signs of mold behind a bathroom vanity are usually a musty or earthy smell that lingers even after cleaning, visible dark splotches or a green tint on the cabinet interior or wall, and warped or soft wood near the base. You may also notice peeling paint, bubbling caulk, or condensation that never dries. Because the space is enclosed, odors often appear before visible growth. If you detect any of these signs of hidden mold in bathroom cabinets, inspect the area with a flashlight and check for drips under the sink before assuming the worst.
Can a musty smell mean there is mold behind my bathroom vanity?
Yes, a persistent musty or earthy smell is one of the most reliable indicators of hidden mold. Mold produces microbial volatile organic compounds as it grows, and in an enclosed vanity cabinet those gases accumulate. Before tearing anything out, check for water damage under bathroom vanity areas: look for drips under the sink, loose pipe fittings, and stained cabinet floors. If the smell remains after cleaning and drying the space, mold is likely growing in the wall cavity or under the cabinet base, and a professional inspection is the next step.
How do I check for mold behind walls without removing the vanity?
Start with a flashlight and a mirror to inspect the cabinet interior, the wall behind the pipes, and the floor under the sink. Look for visible discoloration, bubbling paint, or soft drywall. A moisture meter, available at most hardware stores, can confirm damp spots without cutting into the wall. If the meter reads consistently high or you find soft materials, you may need to remove the vanity to check for mold behind walls properly. Avoid disturbing suspected mold without proper protection, and call a professional if the affected area is larger than a small patch.
What is the best bathroom mold prevention strategy?
Bathroom mold prevention comes down to moisture control. Run the exhaust fan during and for at least 20 minutes after showers, fix leaky pipes and drips under the sink promptly, and wipe down damp surfaces. Check the caulk and grout around the vanity and shower corners every few months and re-seal as needed. Keep the cabinet interior dry by storing bottles upright and using a moisture absorber. If you are planning a renovation, specify materials that hold up to moisture and ensure the vanity is installed with a proper seal against the wall.
