
Table of Contents
- Start With a Lighting Plan, Not Just Fixtures
- Bathroom Lighting Color Temperature: The 2700K to 3000K Rule
- Layered Lighting for Bathrooms: Ambient, Task, and Accent
- Wet-Rated Bathroom Light Fixtures: What Safety Requires
- Dimmers, Smart Controls, and Circadian Lighting
- Matching Fixture Style to Your Spa Vision
- Budget-Friendly Retrofitting for Small Bathrooms
- Common Bathroom Lighting Mistakes to Avoid
- Frequently Asked Questions
Last Updated: September 15, 2026
Start With a Lighting Plan, Not Just Fixtures
Choosing fixtures before you plan the light they cast is the most common mistake in spa bathroom design. A lighting plan maps what each zone in the room needs to do, then selects fixtures to match, and it is the difference between a bathroom that feels calm and one that just looks busy.
Bathroom Renovators, with over 26 years renovating homes across the North Shore and Greater Vancouver, builds every spa project from that plan outward. The approach matters because wet rooms are unforgiving: moisture, mirror reflection, and small footprints all change how light behaves.
Below, we’ll show you exactly how to plan lighting in the right order, from color temperature to fixture specs, so the finished room feels like a retreat rather than a showroom.
Bathroom Lighting Color Temperature: The 2700K to 3000K Rule
For a spa feel, keep bathroom lighting color temperature between 2700K and 3000K (2003 Survey of Household Energy Use). This range produces warm white light that flatters skin tones and relaxes the eye, while anything above 3500K reads as clinical and cool.
Color temperature is the warmth or coolness of a light source, measured in kelvin (K). Lower numbers are warmer; higher numbers are cooler and bluer.
Why Warm White Beats Cool White for Relaxation
Cool white light mimics midday sun, which signals alertness. In a bathroom, that is the opposite of what you want at 6 a.m. or before bed. Warm white light at 2700K to 3000K supports the wind-down feeling most people are chasing when they ask for a spa bathroom.
A practical compromise many designers use: 3000K for the vanity (so makeup and shaving stay accurate) and 2700K for ambient and accent layers. If you want one temperature throughout, 3000K is the safer middle ground.
Layered Lighting for Bathrooms: Ambient, Task, and Accent
Layered lighting for bathrooms means splitting the room into three jobs: ambient light for overall brightness, task lighting for the vanity and mirror, and accent lighting for mood. A single ceiling fixture does none of these well, which is why one-bulb bathrooms always feel flat.
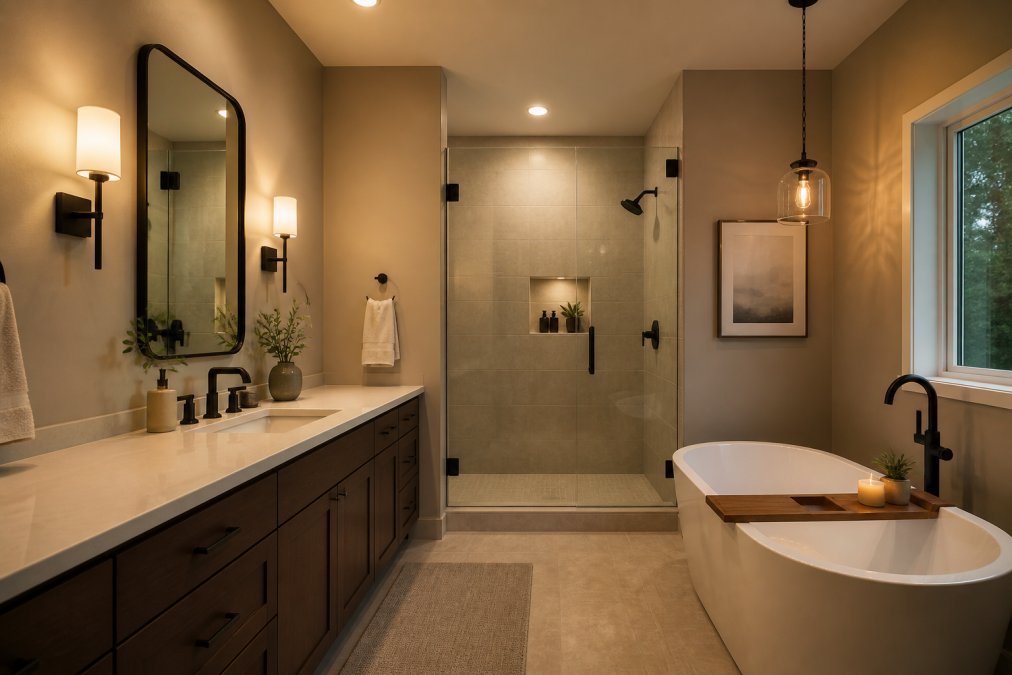
- Ambient: recessed ceiling lights or a central fixture for general illumination
- Task: sconces or pendants beside the vanity mirror for shadow-free grooming
- Accent: a pendant over the tub, toe-kick lighting, or a lit niche for atmosphere
Getting Vanity and Mirror Lighting Placement Right
Place vanity lighting at eye level on both sides of the mirror, not directly above it. Overhead-only lighting casts shadows under the eyes and nose, which is exactly the look most people want to avoid.
Sconces mounted roughly at face height, flanking the mirror, give even, diffused light with minimal glare. If your mirror is wide, add a third light source above it to fill the center. This single change does more for a spa feel than any fixture upgrade.
Wet-Rated Bathroom Light Fixtures: What Safety Requires
Wet-rated bathroom light fixtures are built to handle direct water contact and are required inside showers and over tubs. Damp-rated fixtures handle humid areas like the general bathroom but not direct spray. Getting this wrong is a safety issue, not just a style one.
Most guides stop there. The real decision comes down to two numbers on the product box that almost nobody checks: the IP rating and the CRI. Decoding them is what separates a professional install from a guess.
How to Read an IP Rating (and Which One You Actually Need)
An IP (Ingress Protection) rating is a two-digit code. The first digit covers solids (dust, debris) on a 0-6 scale. The second digit covers water on a 0-8 scale. For bathrooms, the second digit is the one that matters.
- IP44, splash-resistant. Fine for a vanity sconce well away from the tub or shower.
- IP65, dust-tight and protected against water jets. The practical minimum for a fixture mounted inside a shower enclosure or directly over a tub.
- IP66/IP67, protected against powerful jets or temporary immersion. Overkill for most residential bathrooms, but common in steam showers and wet rooms.
A common pattern is to see a beautiful fixture rated IP20 or IP23 (no meaningful water protection) sold as “bathroom lighting.” It is not. If the fixture sits inside the shower footprint or within reach of the tub, IP65 is the working target. Anything lower belongs outside the spray zone.
A fixture can be damp-rated and still fail in a shower. Damp rating covers humidity, not direct spray. If water can hit the fixture, you need the IP number, not the marketing label.
CRI: The Spec That Decides Whether Skin Looks Healthy
CRI (color rendering index) measures how accurately a light source shows true colors, on a scale up to 100, with 100 being daylight-equivalent. For a spa feel, aim for CRI 90 or higher, ideally 95+ at the vanity.
Why it matters more in a bathroom than almost any other room:
- Makeup and skincare, low-CRI light (typically 80 or below) shifts reds and skin tones, so foundation and blush read differently in the bathroom than in daylight. You apply more than you need.
- Tile and stone, natural stone, marble, and glazed tile have subtle veining and warmth that only show up under high-CRI light. Under CRI 80, they look flat and gray.
- Towels and finishes, brushed brass, matte black, and warm wood all depend on accurate rendering to read as intended.
A practical rule: match CRI across every fixture in the room. Mixing a CRI 95 vanity light with CRI 80 recessed cans creates visible color shifts between zones, which reads as sloppy even when nobody can name why.
Matching Fixtures to Zones
| Zone | Typical IP target | CRI target |
|---|---|---|
| Inside shower / over tub | IP65 | 90+ |
| Vanity / mirror | IP44 | 95+ |
| General ceiling (dry area) | IP44 or damp-rated | 90+ |
| Toe-kick / niche accent | IP44 | 90+ |
Check both numbers before you buy. They take two minutes to verify and they are the difference between a room that feels calm and one that feels off without anyone being able to say why.
Dimmers, Smart Controls, and Circadian Lighting
A dimmer switch is the cheapest upgrade with the biggest spa payoff. Being able to drop the vanity lights to 20% for a soak, then bring them up for morning routines, changes how the whole room feels. But not every dimmer works with every LED, and the wrong pairing produces flicker, buzz, or a narrow dimming range that bottoms out at 40% instead of 5%.
Dimmer Compatibility: The Spec Nobody Checks
LED fixtures need a dimmer rated for LED loads (often labeled “LED-compatible” or “ELV/MLV”). A dimmer designed for incandescent or halogen bulbs will often flicker or hum when paired with an LED driver. Two things to verify before buying:
- Minimum load, many LED dimmers have a minimum wattage (commonly 10-25 W). If your total LED load is below that, the lights may flicker or refuse to dim smoothly.
- Dimming range, look for a stated range like “5%-100%” rather than a vague “dimmable.” A 5% floor gives you a genuine low-light soak setting; a 20% floor does not.
If you are retrofitting, a single dimmer on the main vanity circuit gets you most of the way to a spa feel without touching the rest of the room.
Scene Programming That Actually Fits a Bathroom Routine
Smart controls go further than a single dimmer.
Circadian Lighting in a Bathroom
The highest-impact control upgrade is not a smart hub. It is separating the vanity and ambient circuits onto independent dimmers, then setting two or three scenes you actually use. Everything else is optional.
Matching Fixture Style to Your Spa Vision
Budget-Friendly Retrofitting for Small Bathrooms
Common Bathroom Lighting Mistakes to Avoid
Frequently Asked Questions
What is the recommended color temperature for spa-like bathroom lighting?
Aim for 2700K to 3000K for the overall spa feel. This warm white range mimics candlelight and sunset, which helps your body wind down. For vanity task lighting where you apply makeup or shave, 3000K to 3500K gives better color accuracy without feeling clinical. Avoid anything above 4000K in a bathroom you want to feel relaxing, because cool white light reads as office or hospital, not spa.
How do I choose the right spa lights for a wet environment?
Look for wet-rated bathroom light fixtures anywhere water can reach them directly, such as inside a shower or over a tub. These carry an IP rating of IP65 or higher. Damp-rated fixtures work for general bathroom zones where they only face humidity and splashes, typically IP44. Check the fixture label before buying, because a beautiful pendant that is only dry-rated will fail prematurely in a steamy bathroom.
How can dimmers improve the spa feel in a bathroom?
A dimmer switch lets you shift the same room from bright morning task lighting to low, warm mood lighting for an evening soak. Pair dimmable LED bulbs with a compatible dimmer, since mismatched dimmers cause flicker and buzzing. LED-compatible dimmers cost slightly more but eliminate that problem. If you want automation, a smart dimmer can follow a schedule so the lights warm and dim on their own as the evening progresses.
What are common bathroom lighting mistakes to avoid during a renovation?
The most common mistakes are relying on a single ceiling fixture, placing vanity lights directly above the mirror instead of beside it, and choosing fixtures that are not rated for bathroom moisture. A single overhead light creates harsh shadows on your face. Lights mounted above the mirror cast shadows downward. And dry-rated fixtures in a steamy room corrode or short out early. Layering ambient, task, and accent light solves most of these problems at once.
Getting the lighting right is what turns a functional bathroom into a room you actually want to spend time in, and it is far easier to plan up front than to fix after the tile is set. Bathroom Renovators brings over 26 years of experience, custom design tailored to your space, and projects finished in 7-10 days with minimal disruption and a 1-year warranty. Get your free consultation with Bathroom Renovators and build a bathroom that feels like a retreat every day.
