
Table of Contents
- Sizing Your Vanity Lighting: Fixture Width and Mirror Placement
- Bathroom Vanity Lighting Height: Mounting Your Fixtures Correctly
- Brightness and Color: Lumens, Kelvin, and CRI Explained
- Damp-Rated vs Wet-Rated Bathroom Lights: What You Need to Know
- Best Bathroom Lighting for Makeup Application and Grooming
- Smart Lighting, Accessibility, and Energy Efficiency in 2026
- Frequently Asked Questions
Last Updated: September 13, 2026
Sizing Your Vanity Lighting: Fixture Width and Mirror Placement
Getting the width right is the single decision that separates a vanity that looks intentional from one that looks improvised. The guideline most designers return to is simple: match your vanity lighting fixture width to the vanity cabinet, not the mirror. A fixture that spans roughly the same width as the cabinet delivers even illumination across the whole countertop, while a fixture that’s too short leaves the ends of the vanity in shadow.
The One-Third Rule for Fixture Width
If you’re mounting a single fixture above the mirror, aim for it to span at least one-third of the mirror’s total width, or match the vanity cabinet width for the most balanced result. For a 1.2-metre vanity, that means a fixture in the 1.2-metre range rather than a compact 60-centimetre bar. When in doubt, size up slightly. A fixture that’s marginally wider than the mirror reads as deliberate; one that’s narrower reads as an afterthought.
Bathroom Vanity Lighting Height: Mounting Your Fixtures Correctly
Mount wall sconces at eye level, roughly 1.5 to 1.7 metres from the floor, so the light hits your face rather than the top of your head (oee.nrcan.gc.ca). For a fixture mounted above the mirror, leave 15 to 20 centimetres of clearance between the bottom of the fixture and the top of the mirror frame.
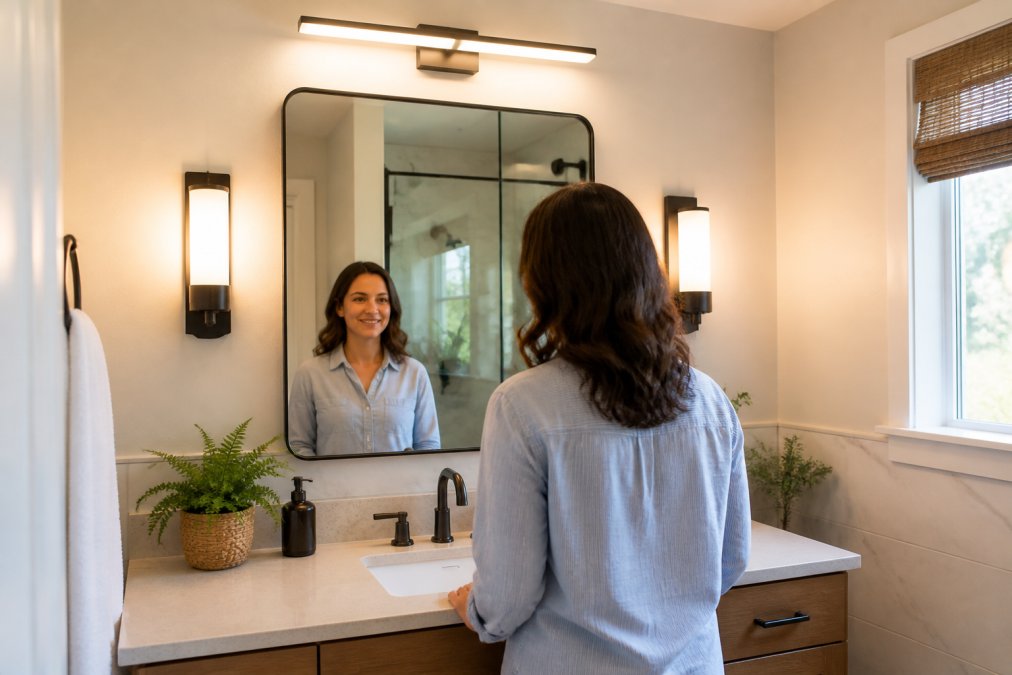
Sconce Height and Spacing
Place sconces about 75 to 90 centimetres apart on centre, positioned so the light source sits at roughly the same height as the viewer’s eyes. This is the detail that determines whether you get flattering, even light or harsh shadows under your brow.
Brightness and Color: Lumens, Kelvin, and CRI Explained
Color temperature is the warmth or coolness of light, measured in Kelvin (K). For a bathroom vanity, 3000K to 4000K hits the sweet spot: warm enough to feel relaxing, cool enough to render skin tones accurately. Anything above 4000K starts to look clinical.
Brightness is measured in lumens, not watts. For a typical vanity, aim for roughly 1000 to 1200 lumens total across your fixtures. The color rendering index (CRI) tells you how faithfully a light shows true colors; look for a CRI of 90 or higher, because anything lower makes makeup and clothing colors look off.
Canadian guidance from Natural Resources Canada’s lighting efficiency resources confirms that LED fixtures now dominate the market for good reason: they run cooler, last far longer, and use a fraction of the energy of older bulbs.
Damp-Rated vs Wet-Rated Bathroom Lights: What You Need to Know
Damp-rated fixtures tolerate moisture and humidity but not direct water contact, which covers most vanity and wall lighting. Wet-rated fixtures are sealed against direct spray and are required inside shower enclosures and directly above tubs. Choosing the wrong rating is a common and costly mistake: a damp-rated fixture installed inside a shower will corrode and fail, sometimes within a year.
| Rating | Where It Belongs | Water Exposure |
|---|---|---|
| Damp-rated | Vanity walls, above mirror, general bathroom ceiling | Humidity, splashes |
| Wet-rated | Inside shower, above tub, direct spray zones | Direct water contact |
Installing a damp-rated fixture inside a shower or directly over a tub is one of the most common bathroom lighting errors. The fixture corrodes, the finish pits, and you’re replacing it long before its rated life. Match the rating to the zone, always.
Best Bathroom Lighting for Makeup Application and Grooming
The best bathroom lighting for makeup application lights your face evenly from the front, using fixtures on both sides of the mirror at eye level. Overhead light alone casts shadows under your eyes, nose, and chin, which is exactly why makeup applied under a single ceiling fixture looks different in daylight.
Avoiding Shadows on the Face
Shadow casting comes from light hitting you at the wrong angle. Sidelights, sconces flanking the mirror, and a diffused light bar work together to eliminate it. If you only have room for one fixture, choose a wide, diffused bar mounted above the mirror rather than a narrow spotlight. A dimmer switch lets you dial brightness down for a softer evening ambiance and up for detailed grooming.
The Three-Point Setup That Actually Works at a Vanity
Think of your vanity the way a photographer thinks of a portrait. You want a key light, a fill light, and enough separation to keep the face from flattening out.
- Key light: the fixture on the side of your face that the mirror reflects most directly, usually the sconce on your dominant-hand side.
- Fill light: the matching sconce on the opposite side, ideally the same wattage and Kelvin so the two sides read as one source.
- Separation: a soft overhead or ceiling source that lifts the hairline and shoulders without throwing a hard shadow down the nose.
A common pattern is two vertical sconces at eye level plus a diffused bar above the mirror. That combination gives you front-facing light on both cheeks, a gentle top wash, and no single hot spot.
Sidelight Spacing and Height for Grooming
Sidelights should sit roughly 75 to 90 centimetres apart on centre, with the light source at roughly the same height as the viewer’s eyes, not above the brow line. If the sconce sits too high, you get raccoon shadows under the eyes; too low, and you light the underside of the chin. For a double vanity, treat each sink as its own lighting zone: one sconce on the outer edge of each mirror plus one shared sconce between the two mirrors is a common and balanced layout.
Pairing Kelvin and CRI for Accurate Color
For makeup and grooming, the two specs that matter most are color temperature and color rendering index. Aim for 3000K to 3500K, warm enough to flatter skin, neutral enough that foundation and blush don’t shift tone. Pair that with a CRI of 90 or higher, ideally 95+, so reds, pinks, and browns render the way they will in daylight. A fixture rated at 2700K will make cool-toned makeup look muddy; one at 5000K will make warm tones look orange. The 3000K-3500K band is the compromise most makeup artists and lighting designers land on.
Mirror-Specific Configurations
- Frameless or backlit mirror: the mirror’s own LED edge provides ambient fill, so you can drop the overhead bar and rely on two sconces for task light.
- Large single mirror over a double vanity: use four sconces, one at each outer edge and one between the two sink zones, rather than two wide bars, which tend to leave a dark seam down the centre.
- Small mirror in a powder room: a single sconce above the mirror plus a wall wash on the opposite wall keeps the face lit without crowding a tight countertop.
- Magnifying mirror: mount it on an adjustable arm so you can pull it into the sconce light rather than relying on a dedicated fixture.
If you can only change one thing, swap a single overhead fixture for two eye-level sconces. It is the highest-impact, lowest-cost fix for makeup that looks wrong in daylight.
A Quick Test Before You Commit
Stand at the vanity at the time of day you actually get ready. Turn on only the proposed fixtures and look for shadows under the eyes, nose, and chin. If you see them, the light is coming from too high or too far behind you. If your skin looks grey or sallow, the Kelvin is too cool. If your blush and lipstick look dull, the CRI is too low. Adjust the fixture position or spec before you buy, not after installation.
Smart Lighting, Accessibility, and Energy Efficiency in 2026
Most vanity lighting guides stop at lumens and mounting height. The three areas below are where the real decisions are being made in 2026.
Smart Vanity Lighting: What’s Actually Worth Wiring For
Smart lighting has moved from novelty to practical default in new builds and renovations. The features that earn their place at a vanity:
- Tunable white (2700K-5000K): shift from bright, cool task light in the morning to warm ambient light at night without changing fixtures. This is the single most useful smart feature for a bathroom.
- App and voice control: useful when your hands are wet or full. Pair with a smart switch rather than relying on the fixture’s own app, so the wall switch still works for guests and for resale.
- Motion and occupancy sensors: ideal for night-time trips and for aging-in-place bathrooms. A sensor that ramps to 10-20% brightness between midnight and 6 a.m. is far kinder than a full-brightness switch.
- Scene presets: a “groom” scene at 3500K and full brightness, a “relax” scene at 2700K and 30% brightness, and a “night” scene at 2200K and 5% brightness covers almost every use case.
The wiring caveat: most smart vanity fixtures need a neutral wire at the switch. Older homes often don’t have one. If you’re renovating, run a neutral to every switch box, it costs almost nothing during the rough-in and saves a rewire later. Also check that your dimmer is compatible with the fixture’s LED driver; mismatched dimmers are the number-one cause of flicker and buzz in smart LED setups.
Accessibility and Aging-in-Place
For elderly users or anyone with low vision, vanity lighting is a safety feature, not a design choice. The priorities shift:
- High contrast, low glare: matte diffusers and indirect light reduce glare, which is the main cause of discomfort for aging eyes. Avoid bare bulbs and polished metal shades that bounce light directly into the face.
- Even illumination, no pools of shadow: the eye takes longer to adapt to bright-to-dark transitions with age, so a uniformly lit vanity is safer than a dramatic one.
- Motion-activated night lighting: reduces fumbling for switches on wet floors, which is a leading fall risk in bathrooms.
- Rocker or large-paddle switches: easier to operate with limited hand strength or arthritis than small toggles or rotary dimmers.
- Higher CRI (90+): helps with medication identification, reading labels, and distinguishing similar-colored objects.
A common pattern in aging-in-place renovations is a layered setup: a motion-sensor night light at floor level, a dimmable sconce pair at eye level, and a task light over the mirror, all on separate controls so the user can choose the level they need.
Energy Efficiency and LED Longevity
LED fixtures draw a fraction of the wattage of halogen equivalents and last for years, which means fewer replacements and lower bills. But the long-term story is more nuanced than “LEDs last forever”:
- Integrated LED vs. replaceable bulbs: integrated fixtures look cleaner and often have better diffusers, but when the LED driver fails, typically after 10 to 15 years of daily use, the whole fixture usually needs replacing. Replaceable-bulb fixtures let you swap a $10-$20 bulb instead. For a vanity you plan to keep for decades, replaceable is often the smarter long-term buy.
- Driver compatibility: cheap dimmers and incompatible LED drivers cause flicker, buzz, and premature failure. Match the dimmer to the driver’s rated compatibility list, and prefer fixtures with a published driver spec.
- Lumen maintenance: LEDs dim gradually over time. A fixture rated L70 means it retains 70% of its initial output at the end of its rated life, usually 25,000 to 50,000 hours. At two hours a day, that’s roughly 35 to 70 years, so the driver, not the LED, is usually the limiting factor.
- Wattage reality check: a 1,000-lumen LED vanity bar typically draws 10-15 watts. The same output from halogen would draw 60-75 watts. Over a year of two-hour daily use, that difference is meaningful on a utility bill, and it also means less heat in a small, enclosed bathroom.
Small Bathrooms and Powder Rooms
Small spaces benefit most from a layered approach: one well-placed diffused fixture plus a mirror light, rather than several competing sources that make a tight space feel cluttered. In a powder room under 2 square metres, a single backlit mirror plus one ceiling fixture is usually enough. In a narrow bathroom, vertical sconces take up less visual width than a horizontal bar and make the room feel taller.
Smart tunable white, motion-sensing night light, and replaceable-bulb fixtures are the three upgrades that pay off most over the life of a bathroom, and almost no vanity lighting guide covers them together.
If you’re planning a renovation and want the lighting, layout, and waterproofing handled together, Canada Mortgage and Housing Corporation’s renovation guidance is a useful starting point for understanding what a thorough job involves.
Frequently Asked Questions
How high should a vanity light be mounted above a mirror?
For a standard ceiling, mount the light fixture approximately 1.5 to 1.7 metres from the floor, or about 1.9 metres at the center. If your mirror is taller, position the fixture 15 to 20 centimetres above the top of the mirror. This height prevents glare while providing even illumination across your face. Always check local building codes, but these guidelines work for most bathroom vanity lighting setups.
Do I need damp-rated lighting for my bathroom?
Yes, any fixture in a bathroom must be at least damp-rated. Damp-rated fixtures handle moisture and humidity, making them suitable for most bathroom areas. If the light will be directly exposed to water splashes, such as inside a shower or over a tub, choose a wet-rated fixture. Standard dry-rated lights can fail prematurely in bathroom conditions, so always check the rating before buying.
What type of lighting is best for a bathroom vanity?
The best setup combines ambient and task lighting. Use a central ceiling fixture for overall illumination, then add wall sconces or light bars on either side of the mirror at eye level for task lighting. This layered approach reduces shadows on your face, which is especially important for makeup application and shaving. Choose fixtures with a color temperature around 3000K to 4000K for a natural look.
What are common vanity lighting mistakes to avoid?
A frequent mistake is placing a single light directly above the mirror, which casts shadows under the eyes and nose. Another is choosing a fixture that is too small for the vanity width; aim for a fixture that is at least one-third the width of your vanity. Also, avoid cool white bulbs (above 4000K) in a bathroom, as they can make skin tones look harsh. Finally, don’t skip a dimmer switch; it adds flexibility for day and night use.
