
Table of Contents
- How to Plan a Bath and Shower Remodeling Project
- Step 1: Set the Scope and Budget for Bathroom Renovations
- Step 2: Get Permits and Meet Building Codes
- Step 3: Strip, Inspect, and Rebuild the Wet Area
- Step 4: Choose Fixtures, Tile, and Sustainable Options
- Step 5: Plan Disabled Bathroom Renovations and Aging-in-Place Features
- Step 6: Book Bathroom Vanity Installation Services and Finishing Trades
- Common Mistakes to Avoid in Bath and Shower Remodeling
- Frequently Asked Questions
Last Updated: September 30, 2026
How to Plan a Bath and Shower Remodeling Project
Bath and shower remodeling is the process of stripping a bathroom down to its framing, correcting water damage and plumbing problems, and rebuilding the wet area with new waterproofing, tile, and fixtures. This guide from Bathroom Renovators walks through the full sequence, from scope and budget to final inspection. We have spent years renovating homes across the North Shore and Greater Vancouver, and the projects that go smoothly are always the ones planned in the right order. Below, we show you exactly how to run that sequence so your renovation finishes on time and holds up to moisture.
What You’ll Need Before You Start
Before demolition day, gather four things:
- A written scope that lists what stays and what goes
- A realistic budget with a contingency line for hidden damage
- Your municipality’s permit requirements, checked in advance
- A contractor shortlist with recent references you can actually call
A common mistake is treating the scope as a wish list. Write it as a decision document instead. If the tub stays, say so. If the vanity moves, mark the new drain location. Contractors price decisions, not ideas.
For reference on how water damage develops behind walls, the Canada Mortgage and Housing Corporation guidance on moisture and mould is worth reading before you start.
Step 1: Set the Scope and Budget for Bathroom Renovations
Budgeting starts with the wet area, not the finishes. Waterproofing, plumbing rough-in, and subfloor repair eat more of the budget than most homeowners expect, and they are the items you cannot skip. Tile and fixtures are where you have room to move.
Build your budget in three layers:
- Must-fix items – leaks, rot, failing plumbing, code issues
- Core rebuild – waterproofing, tile, shower enclosure, vanity installation
- Upgrades – heated floors, niche lighting, premium fixtures
If the must-fix layer comes back clean, you have more room for upgrades. If it does not, you are covered.
Skipping a contingency line is the single most common budgeting error. When a contractor opens a wall and finds rot, the repair has to happen, and it has to happen now. A contingency of 15 to 20 percent keeps the project moving instead of stalling mid-demolition.
Step 2: Get Permits and Meet Building Codes
Most bathroom renovations that move plumbing, add a new circuit, or change ventilation need a permit. Cosmetic work, like replacing a vanity in the same spot or retiling a shower, often does not. Confirm with your local building department before work starts, because unpermitted work can stall a home sale years later.
What actually triggers a permit
The line is not “big versus small.” It is “like-for-like versus changed.” A permit is typically required when you:
- Relocate a drain, supply line, or vent stack
- Add, move, or upgrade an electrical circuit (including heated floors and niche lighting)
- Install or resize a mechanical exhaust fan
- Remove or alter a load-bearing wall
- Convert a tub to a curbless shower, which changes the drain assembly and often the subfloor
Swapping a vanity in the same location, replacing a toilet, retiling over existing waterproofing, or painting does not usually require a permit. When in doubt, call the building department and describe the work in one sentence. They will tell you yes or no, and that call is free.
How the inspection sequence works
A permitted bathroom renovation is not inspected once at the end.
- Rough-in inspection, after framing, plumbing, and electrical are installed but before drywall or tile backer goes on. The inspector needs to see the pipes, wires, and vent connections.
- Insulation and vapor barrier inspection, in some jurisdictions, before the wall is closed.
- Final inspection, after fixtures, outlets, and the exhaust fan are installed and functional.
What happens without a permit
The two areas that trip people up most
Do not let a contractor talk you out of a permit to save time. The permit is the homeowner’s protection. It is the only record that the work was inspected by a third party who does not work for the contractor.
If you are hiring renovators for a bathroom-renovator project, ask for the permit number before demolition starts. A legitimate contractor will have it. If they hesitate, that is your answer.
Step 3: Strip, Inspect, and Rebuild the Wet Area
Demolition is diagnostic. Once the tile and backer board come off, you see the real condition of the subfloor, framing, and plumbing, and that inspection decides the next two weeks of work.
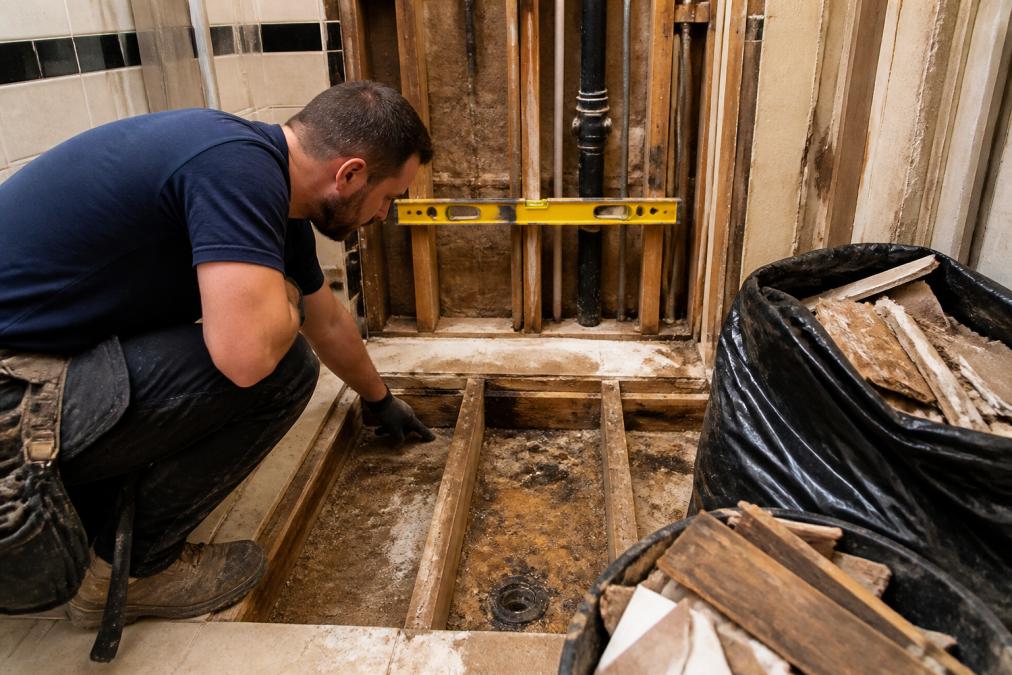
Three checks matter most:
- Subfloor inspection – probe for soft spots and staining around the toilet and shower
- Rough-in plumbing – confirm drain slope and supply line condition before closing walls
- Framing – replace any lumber that crumbles or shows mould
Step 4: Choose Fixtures, Tile, and Sustainable Options
| Material | Best For | Watch Out For | Long-Term Care |
|---|---|---|---|
| Porcelain tile | Shower walls and floors | Slippery when wet unless textured | Re-grout or seal grout every 3-5 years |
| Natural stone (marble, travertine) | Feature walls, vanity tops | Etches from acidic cleaners; stains from soap scum | Seal every 1-2 years; pH-neutral cleaner only |
| Acrylic shower panels | Fast installs, low budget | Can flex; scratches show | Mild soap and water; no abrasive pads |
| Quartz vanity top | Daily wear | Heavier than laminate; seams visible on long runs | Wipe with mild cleaner; no sealing needed |
| Low-flow fixtures | Water efficiency | Check flow rate suits your hot water | Clean aerators every 6 months |
The maintenance reality behind each choice
Sustainable options that actually pay back
- Low-flow showerheads, modern models deliver strong pressure at lower flow rates, so the experience does not suffer
- Dual-flush toilets, a simple mechanism that cuts flush volume significantly over a standard toilet
- WaterSense-style efficiency ratings, a recognizable benchmark for fixtures that meet verified water-use thresholds
- Tankless or on-demand hot water, reduces standby heat loss, though it requires a larger upfront investment and a dedicated circuit
- Recycled or locally sourced tile, reduces transport emissions, though availability varies by region
If you are comparing quotes and one contractor lists “epoxy grout” while another lists “grout,” ask which one. The difference in shower maintenance over ten years is significant, and it is rarely explained upfront.
For homeowners planning disabled bathroom renovations or aging-in-place features, material choice matters even more. Non-slip flooring, curbless shower bases, and reinforced wall backing all interact with the tile and waterproofing system, so they need to be decided together, not after the tile is ordered.
Step 5: Plan Disabled Bathroom Renovations and Aging-in-Place Features
Accessibility features are easiest to add during a renovation and expensive to retrofit later. If anyone in the home may need them down the road, plan for them now.
Disabled bathroom renovations typically include:
- Curbless walk-in shower with a linear drain
- Grab bars blocked and reinforced behind the tile
- Comfort-height toilet and a wider doorway
- Non-slip flooring and a fold-down bench
Step 6: Book Bathroom Vanity Installation Services and Finishing Trades
Finishing trades run in a fixed order, and skipping ahead causes damage. Vanity installation services come after tile and paint, not before. The sequence is:
- Tile and grout cure
- Paint walls and ceiling
- Install vanity, mirror, and lighting
- Connect plumbing and test for leaks
- Final silicone, caulk, and cleanup
Ask your contractor for references from the last year or two, not from a decade ago. A company with a long history still needs to prove its recent work holds up. Call two or three recent clients and ask one question: did the timeline hold?
Common Mistakes to Avoid in Bath and Shower Remodeling
The same errors sink project after project. Here are the ones worth guarding against.
- Rushing waterproofing – the leading cause of leaks and mould
- Skipping the subfloor inspection – hides rot that returns within a year
- No permit for plumbing changes – creates resale and inspection problems
- Choosing tile on looks alone – smooth tile in a shower is a slip risk
- No blocking for grab bars – forces a retile if accessibility is added later
- Paying in full upfront – leaves you with no use if work stalls
Frequently Asked Questions
How much does it cost to remodel a bathtub and shower?
Costs depend on the scope: a tub-to-shower conversion, a full layout change, and a simple liner replacement all price differently. Materials, fixture grade, and any hidden water damage found during demolition will move the number most. Rather than quote a figure that may not match your space, a reputable renovator will inspect the bathroom and give you a written estimate before you commit. Ask for a free consultation so the quote reflects your actual layout, not a generic average.
What are the most durable materials for a shower remodel?
Porcelain or ceramic tile over a properly waterproofed substrate is the standard for durability in a wet area. Large-format tiles mean fewer grout lines, which reduces maintenance. For the base, a tiled shower pan with a correct slope and a bonded waterproofing membrane lasts longer than a preformed plastic pan if it is installed well. Grout should be sealed or replaced with epoxy grout in high-moisture zones. The substrate and waterproofing matter more than the tile surface you see.
How long does a typical bathroom renovation take?
A focused bath and shower remodeling project can be completed in 7 to 10 days when the layout stays the same and no hidden damage is found. Projects that move plumbing, change the layout, or uncover rot or mold will take longer because the rebuild has to dry and pass inspection before tiling. Ask your contractor for a written schedule with named milestones and confirm how change orders affect that timeline before work starts.
How can I ensure my bathroom renovation is accessible for aging in place?
Plan for a curbless or low-threshold walk-in shower, blocking in the walls for future grab bars, a comfort-height toilet, and a clear turning radius for a walker or wheelchair. Lever handles on faucets and a handheld shower head add usability without looking clinical. If you are planning disabled bathroom renovations, confirm the work meets local building code and consider a licensed contractor who has completed accessible bathrooms before, so the waterproofing and drainage still perform over time.
